1. state란 무엇인가
리액트에서 state는 리액트 컴포넌트의 상태
상태라는 단어가 정상이냐, 비정상이냐를 나타내는 것보다는 리액트 컴포넌트의 데이터라는 의미에 더 가깝다.
리액트 컴포넌트의 변경 가능한 데이터를 state라고 부른다.
state는 사전에 미리 정해진 것이 아니라, 리액트 컴포넌트를 개발하는 개발자가 직접 정하는 것이다.
state를 정의할 때 중요한 점은 렌더링이나 데이터 흐름에 사용되는 값만 state에 포함시켜야 한다는 점이다.
state가 변경될 경우 컴포넌트가 재렌더링되기 때문에,
렌더링과 데이터 흐름에 관련 없는 값을 포함시키면, 컴포넌트가 다시 렌더링되어 성능을 저하 시킬 수 있다.
그래서 렌더링과 데이터 흐름에 관련 있는 값만 state에 포함하도록 해야하며,
그렇지 않은 값은 컴포넌트 인스턴스의 필드로 정의하면 된다
2. state의 형태
state는 복잡한 형태가 있는 것이 아니라, 그냥 하나의 자바스크립트 객체이다.
class LikeButton extends React.Component {
    constructor(props) {
        super(props);
        this.state = {
            liked: false
        }
    }
    ....

}
위 코드는 LikeButton이라는 리액트 클래스 컴포넌트를 일부 나타냈다.
모든 클래스 컴포넌트는 constructor라는 이름의 함수가 존재하며, 우리말로 생성자이다.
클래스가 생성될 때 실행되는 함수이다.
이 함수내의 코드에 this.state라는 부분이 있는데 여기서 현재 컴포넌트의 state를 정의한다
클래스 컴포넌트의 경우 state를 생성자에서 정의한다.
함수 컴포넌트는 state를 useState()라는 훅을 사용해서 정의하게 된다.
이렇게 정의한 state는 정의된 이후, 일반적인 자바스크립트 변수를 다루듯이, 직접 수정할 수는 없다.
수정이 가능하긴 하나, 그렇게 하는것을 권장하지 않는다
// state를 직접 수정하기 (잘못된 사용)
this.state = {
    name: 'daehyuck'
}

//setState 함수로 수정(정상적인 사용)
this.setState({
    name: 'daehyuck'
})
state를 직접 수정하는것이 가능하긴하나, 리액트가 수정한 것을 제대로 인지하지 못할 수 있어서,
애초에 state는 직접 변경하는 것이 불가능하다고 생각하는 것이 좋다.
그리고 state는 컴포넌트의 렌더링과 관련이 있어서, 마음대로 직접 수정하면 의도한 대로 동작하지 않을 수 있다.
그래서 state를 변경하고자 할 때 setState()라는 함수를 사용해서 수정해야한다.
3. 생명주기
lifecycle
컴포넌트가 생성되는 시점과 사라지는 시점이 정해져있다는 의미입니다

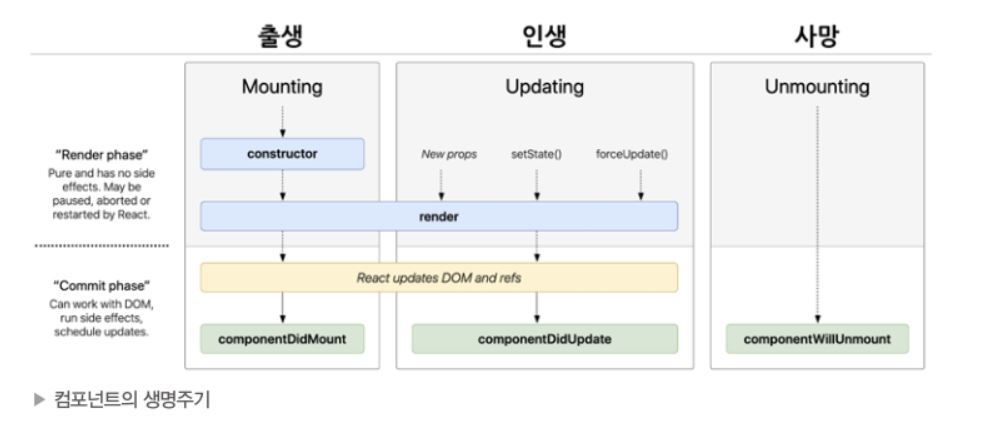
위 그림은 리액트 클래스 컴포넌트의 생명주기입니다
출생, 인생, 사망으로 나누어져 있습니다
각 과정의 하단에 초록색으로 표시된 부분은 생명주기에 따라 호출되는 클래스 컴포넌트의 함수입니다.
lifecycle method라고 부르며 번역하면 생명주기 함수라고 합니다.
3-1) mount
컴포넌트가 생성되는 시점, 사람으로 말하면 출생으로 mount라고 부릅니다.
이때 컴포넌트의 constructor(생성자)가 실행됩니다.
생성자에서는 컴포넌트의 state를 정의하게 됩니다.
또한 컴포넌트가 렌더링되며 이후에 componentDidMount() 함수가 호출됩니다
3-2) update
사람은 인생을 살아가는 동안 신체적, 정신적으로 변화를 겪습니다.
리액트 컴포넌트도 생애 동안 변화를 겪으며 여러번 렌더링됩니다.
이를 리액트 컴포넌트에서 update라고 부릅니다.
update과정에서는 컴포넌트의 props가 변경되거나, setState() 함수 호출에 의해 state가 변경되거나,
forceUpdate()라는 강제 업데이트 함수 호출로 인해 컴포넌트가 다시 렌더링됩니다.
렌더링 이후에 componenDidUpdate()함수가 호출됩니다.
3-3) unmount
사람은 누구나 나이를 먹고 죽게됩니다.
리액트 컴포넌트도 결국 언젠가 사라지는 과정을 겪게 되는데, 이를 unmount라고 부릅니다.
상위 컴포넌트에서 현재 컴포넌트를 더 이상 화면에 표시하지 않게 될 때 unmount 된다고 볼 수 있습니다.
이 때 unmount 직전에 componentWillUnmount() 함수가 호출됩니다.
-------------------------------------------------------------------------------
이 외에 여러 생명주기 함수가 존재하지만, 클래스 컴포넌트를 거의 사용하지 않아 다루지 않습니다.
컴포넌트 생명주기에서 기억할 부분은
"컴포넌트가 계속 존재하는 것이 아니라 시간의 흐름에 따라 생성되고 업데이트되다가 사라진다는 것"
이는 함수 컴포넌트도 해당하는 내용이다.
4. 실습으로 따라해보기
먼저 $npx create-react-app my-app으로 react app 생성
src 폴더에 chapter_06폴더 생성
Notification.jsx라는 파일을 새로 만들고 아래 코드처럼 작성
import React from 'react';

const styles = {
    wrapper: {
        margin: 8,
        padding: 8,
        display: 'flex',
        flexDirection: 'row',
        border: '1px solid grey',
        borderRadius: 16
    },
    messageText: {
        color: 'black',
        fontSize:16,
    }
}

class Notification extends React.Component {
    constructor(props) {
        super(props);

        this.state={}
    }

    render() {
        return (
            <div style = {styles.wrapper}>
                <span style={styles.messageText}>
                    {this.props.message}
                </span>
            </div>
        )
    }
}

export default Notification;
Notification 컴포넌트의 constructor 부분은 state에서 아무런 데이터도 가지고 있지 않다.
Notification 컴포넌트를 다 만들었으면, 동일한 폴더에 NotificationList.jsx라는 파일을 만들고 코드 작성
Notification 컴포넌트를 목록 형태로 보여준다.
import React from 'react';
import Notification from './Notification';

const reservedNotifications = [
    {
        message:"안녕하세요, 오늘 일정을 알려드립니다.",
    },
    {
        message:"점심 식사 시간입니다.",
    },
    {
        message:"이제 곧 미팅이 시작됩니다.",
    },

]

var timer;

class NotificationList extends React.Component {
    constructor(props){
        super(props);

        this.state={
            notifications: [],
        }
    }

    componentDidMount() {
        const {notifications} = this.state;

        timer = setInterval(() => {
            if (notifications.length < reservedNotifications.length){
                const index = notifications.length;
                notifications.push(reservedNotifications[index]);
                this.setState({
                    notifications: notifications
                })
            }
            else {
                clearInterval(timer);
            }
        },1000);
    }

    render() {
        return (
            <div>
                {this.state.notifications.map((notification) => {
                    return <Notification message={notification.message} />
                })}
            </div>
        )
    }
}

export default NotificationList;
여기서 눈여겨볼 곳은 state를 선언하고 사용하는 부분입니다.
notifications라는 이름의 빈 배열을 state에 넣은 것을 볼 수 있습니다.
생성자에는 이처럼 앞으로 사용할 데이터를 넣어서 초기화합니다.
class NotificationList extends React.Component {
    constructor(props){
        super(props);

        this.state={
            notification: [],
        }
    }
그리고 클래스 컴포넌트의 생명주기 함수 중 하나인 componentDidMount() 함수에서는
자바스크립트의 setInterval() 함수를 사용해서 매 1000ms(1초)마다 정해진 작업을 수행합니다.
미리 만들어둔 알림 데이터 배열인 reservedNotifications로부터 알림 데이터를 하나씩 가져와서 state에 있는 notifications 배열에 넣고 업데이트합니다.
여기에서 주목할 부분은 state를 업데이트하기 위해 setState() 함수를 사용한다는 것입니다.
클래스 컴포넌트에서 state를 업데이트하려면 반드시 setState() 함수를 사용해야한다.
    componentDidMount() {
        const {notifications} = this.state;

        timer = setInterval(() => {
            if (notifications.length < reservedNotifications.length){
                const index = notifications.length;
                notifications.push(reservedNotifications[index]);
                this.setState({
                    notifications: notifications
                })
            }
            else {
                clearInterval(timer);
            }
        },1000);
    }
이제 만든 파일을 실제 화면에 렌더링할려면, index.js 파일을 수정한다.
import NotificationList from './chapter_06/NotificationList';

const root = ReactDOM.createRoot(document.getElementById('root'));
root.render(
  <React.StrictMode>
    <NotificationList />
  </React.StrictMode>
);
npm start로 실행해본다.
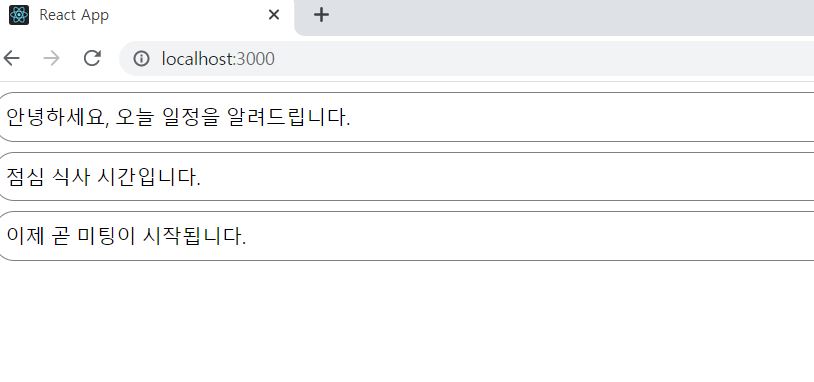
처음에는 아무것도 안보이다가 매초 화면에 알림이 뜨듯이 하나씩 보인다

구글에 react developer tools 검색해서 맨 위에 나오는곳 들어가서 확장프로그램 설치
그 후 개발자 도구에서 components 창 보면 component에 대해 볼 수 있다

component 옆에 profiler 탭에서 컴포넌트가 렌더링되는데 걸리는 시간을 파악할 수 있음
어떤 컴포넌트가 렌더링되는지, 시간이 얼마나 소요되었는지, 왜 다시 렌더링되는지 등을 파악 가능함
그래서 불필요하게 렌더링되거나 무거운 컴포넌트를 찾아서 최적화해서 리액트 애플리케이션의 성능 향상시키기 가능
나는 쓸일은 없을듯...

다음과 같이 생명주기 함수가 호출될 경우 콘솔에 로그를 남기도록 Notification.jsx 코드를 작성
import React from 'react';

const styles = {
    wrapper: {
        margin: 8,
        padding: 8,
        display: 'flex',
        flexDirection: 'row',
        border: '1px solid grey',
        borderRadius: 16
    },
    messageText: {
        color: 'black',
        fontSize:16,
    }
}

class Notification extends React.Component {
    constructor(props) {
        super(props);

        this.state={}
    }

    componentDidMount() {
        console.log("componentDidMount() called.")
    }

    componentDidUpdate() {
        console.log("componentDidUpdate() called.")
    }

    componentWillUnMount() {
        console.log("componentWillUnMount() called.")
    }

    render() {
        return (
            <div style = {styles.wrapper}>
                <span style={styles.messageText}>
                    {this.props.message}
                </span>
            </div>
        )
    }
}

export default Notification;
콘솔 탭에서 다음과 같이 로그를 확인할 수 있지만,
중복되어 구분이 어렵다

로그에 id까지 함께 나오게 하기 위해 id를 추가해본다
//NotificationList.jsx

const reservedNotifications = [
    {
        id: 1,
        message:"안녕하세요, 오늘 일정을 알려드립니다.",
    },
    {
        id:2,
        message:"점심 식사 시간입니다.",
    },
    {
        id:3,
        message:"이제 곧 미팅이 시작됩니다.",
    },

]
그리고 다음처럼 Notification 컴포넌트에 전달할 props에 키와 id를 추가해주자
키는 리액트 엘리먼트를 구분하기 위한 고유 값인데 map()함수를 사용할 때 필수적으로 들어가야한다.
그렇지 않으면 경고 메시지가 출력된다.
class NotificationList extends React.Component {
    constructor(props){
        super(props);

        this.state={
            notifications: [],
        }
    }

    componentDidMount() {
        const {notifications} = this.state;

        timer = setInterval(() => {
            if (notifications.length < reservedNotifications.length){
                const index = notifications.length;
                notifications.push(reservedNotifications[index]);
                this.setState({
                    notifications: notifications
                })
            }
            else {
                clearInterval(timer);
            }
        },1000);
    }

    render() {
        return (
            <div>
                {this.state.notifications.map((notification) => {
                    return <Notification
                    key = {notification.id}
                    id = {notification.id}
                    message={notification.message} />
                })}
            </div>
        )
    }
}
그 후 notification.jsx에서 로그를 출력할 때 id를 함께 출력하도록 한다.
문장을 묶을때, '가 아니라 `를 써야한다
// Notification.jsx

class Notification extends React.Component {
    constructor(props) {
        super(props)


        this.state = {}

    }

    componentDidMount() {
        console.log(`${this.props.id} componentDidMount() is called.`)
    }

    componentDidUpdate() {
        console.log(`${this.props.id} componentDidUpdate() is called.`)

    }

    componentWillUnmount() {
        console.log(`${this.props.id} componentWillUnmount() is called.`)

    }

    render() {

        return (
            <div style={styles.wrapper}>
                <span style={styles.messageText}>{this.props.message}</span>
            </div>

        )
    }
}

export default Notification;
그 후 실행해보면 다음과 같다
컴포넌트가 마운트 될때, 업데이트 될때 로그가 출력되고 있다

근데 componentWillUnmount()는 출력되고 있지 않다.
당연히 컴포넌트가 마운트만 되고 언마운트는 안되니까
class NotificationList extends React.Component {
    constructor(props){
        super(props);

        this.state={
            notifications: [],
        }
    }

    componentDidMount() {
        const {notifications} = this.state;

        timer = setInterval(() => {
            if (notifications.length < reservedNotifications.length){
                const index = notifications.length;
                notifications.push(reservedNotifications[index]);
                this.setState({
                    notifications: notifications
                })
            }
            else {
                this.setState({
                    notifications: [],
                });
                clearInterval(timer);
            }
        },1000);
    }

    render() {
        return (
            <div>
                {this.state.notifications.map((notification) => {
                    return <Notification
                    key = {notification.id}
                    id = {notification.id}
                    message={notification.message} />
                })}
            </div>
        )
    }
}
언마운트 로그를 보기 위해 notificationlist 컴포넌트에서 매초 알림을 추가하는 부분에,
알림 추가가 모두 끝나면 notifications 배열을 비우도록 수정하자
this.setState({ notifications:[],});을 추가
    componentDidMount() {
        const {notifications} = this.state;

        timer = setInterval(() => {
            if (notifications.length < reservedNotifications.length){
                const index = notifications.length;
                notifications.push(reservedNotifications[index]);
                this.setState({
                    notifications: notifications
                })
            }
            else {
                this.setState({
                    notifications: [],
                });
                clearInterval(timer);
            }
        },1000);
    }

그러면 notifications가 비워지면서 엘리먼트가 소멸되어 unmount도 일어나게 된다
'프로그래밍 > React' 카테고리의 다른 글
| 리액트 기본 배우기 -이벤트 처리- (0) | 2023.01.12 |
|---|---|
| 리액트 기본 배우기 -훅에 대해서- (0) | 2023.01.12 |
| 리액트 기본 배우기 -컴포넌트에 대하여- (1) | 2023.01.10 |
| react 기본 익히기 - element에 대하여- (0) | 2023.01.10 |
| react 기본 익히기 -JSX에 대하여- (1) | 2023.01.09 |

